
How to Do a Breast Self-Exam the Right Way (And What You’re Actually Feeling For)
Most women have been told to “check their breasts” at some point. Far fewer have been shown exactly how, or told what they’re actually supposed to be feeling for.
That gap matters. A lot.
Why a Monthly Breast Self-Exam Is Still Worth Your Time
Let’s address the elephant in the room first. You may have heard that medical organizations no longer officially “recommend” breast self-exams as a formal screening tool. That’s partially true. The nuance is that experts stopped recommending it as a replacement for mammograms, not as something worthless.
Here’s the number that should make you sit up: according to the National Breast Cancer Foundation, 40% of diagnosed breast cancers are detected by women who feel a lump themselves. That statistic belongs in lights.
A breast self-exam (BSE) is not about diagnosing cancer at home. It’s about becoming so familiar with your own body that when something changes, even slightly, you notice it immediately. Think of it like knowing your car well enough to hear when the engine starts sounding different. You won’t know what’s wrong, but you’ll know something is. That awareness is priceless.
Done monthly, a breast self-exam takes about 10 minutes. It costs nothing. It requires no appointment, no gown that ties at the back, and no waiting room. And it can absolutely save your life when combined with regular clinical screenings.
This guide will walk you through every step of a thorough breast self-exam, explain what different textures and changes actually mean, and help you build the kind of body literacy that most women never get taught.
When Is the Best Time to Do Your Breast Self-Exam?
Timing your breast self-exam correctly makes a real difference in what you feel, and how clearly you feel it.
Breast tissue changes throughout the month in response to hormone fluctuations. Right before your period, breasts are often swollen, tender, and lumpier than usual. Examining yourself then is like trying to read a map in a windstorm. Messy, confusing, and not particularly useful.
The ideal timing:
- If you still have periods: Perform your breast self-exam 3 to 5 days after your period ends. At this point, hormone levels have leveled off, swelling has gone down, and your breast tissue is at its calmest and most readable.
- If you are postmenopausal or do not menstruate: Choose a consistent calendar date each month, such as the 1st or 15th. Consistency matters more than the specific date.
- If you are pregnant or breastfeeding: Your breasts will feel different than usual, but self-exams are still worth doing. Talk to your midwife or OB about what to watch for during this period.
The whole point of doing this monthly is to build a baseline. You’re not looking for anything alarming on day one. You’re learning what your normal is, so that anything new stands out clearly.
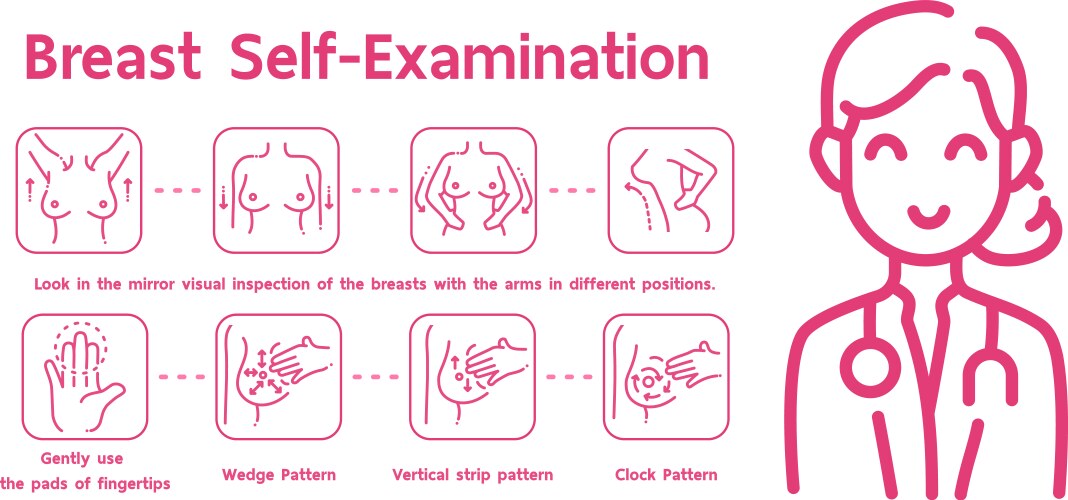
Step One: The Mirror Check (Visual Breast Self-Exam)
Before your hands ever touch your skin, your eyes do the first round of the breast self-exam. Visual inspection catches things that feel-based exams can miss entirely, including skin changes, shape asymmetry, and nipple position shifts.
Stand comfortably in front of a full-length or bathroom mirror in good lighting, with your shirt and bra removed.
Position 1: Arms at your sides
Look at both breasts directly. You’re not looking for perfection or symmetry. Most women’s breasts are naturally slightly different in size or shape, and that’s completely normal. What you’re looking for is change from your own baseline.
Examine for:
- Any new dimpling, puckering, or indentations in the skin
- Areas where the skin looks thickened or has an orange-peel texture (called peau d’orange)
- Visible swelling in one breast but not the other
- Redness, rash, or unusual warmth on the skin
- A nipple that has newly turned inward (inverted) when it wasn’t before
- Any visible lump or bulge under the skin
Position 2: Arms raised overhead
Lift both arms above your head and look again. This changes the tension on the breast tissue and can reveal dimpling or skin tethering that wasn’t visible before. Check the underside and outer edges of each breast carefully.
Position 3: Hands on hips, chest flexed
Press your hands firmly into your hips and flex your chest muscles slightly. This position can make subtle contour changes more visible. Look for any difference in how the two breasts move or hold their shape.
Take your time with each position. This is not a race.
Step Two: The Lying-Down Palpation (The Most Thorough Breast Self-Exam Position)
Once the visual check is done, the hands-on portion of your breast self-exam begins. The lying-down position is considered the gold standard for palpation because it spreads breast tissue evenly across the chest wall, making it thinner and easier to examine thoroughly.
Lie flat on your back on a bed or firm surface. Place a small pillow or folded towel under your right shoulder to tilt your chest slightly. This shifts the right breast tissue toward the center of your chest, flattening it for easier access.
Raise your right arm and place your right hand behind your head.
Now use the pads of the three middle fingers of your left hand to examine the right breast. This is a subtle but important distinction: use the flat, fleshy pads of your fingers, not the tips, and definitely not your palm. The pads have far more nerve sensitivity and will pick up subtle changes that fingertips miss.
Apply pressure in three layers:
- Light pressure to feel the tissue just under the skin
- Medium pressure to feel the middle layers of breast tissue
- Firm pressure to feel the deeper tissue near the chest wall and ribs
You need all three pressure levels to examine the full depth of the breast. Using only one level means you’re missing entire layers.
Step Three: Choosing Your Search Pattern for the Breast Self-Exam
This is where most women go wrong. They squeeze, poke, and prod in no particular order and then wonder if they’ve missed something. The answer is: probably yes.
A systematic search pattern ensures you cover every square centimeter of breast tissue. There are three widely used patterns. Choose one and stick with it every month. Consistency matters more than which pattern you pick.
The Vertical Strip (Lawn Mower) Pattern — Most Recommended
Move your fingers up and down in vertical lines, like mowing a lawn. Start in the armpit area and move across the entire breast toward the sternum (breastbone). Each strip should slightly overlap the previous one. This method has the best evidence for full coverage.
The Circular (Spiral) Pattern
Begin at the outer edge of the breast and move in increasingly smaller circles toward the nipple. Some women find this pattern more intuitive, though it requires care to ensure complete coverage.
The Wedge (Pie Slice) Pattern
Divide the breast mentally into wedge-shaped sections, like pizza slices. Examine each wedge by moving from the outer edge toward the nipple, then back out again.
Whichever pattern you use, cover this entire territory:
- From the collarbone down to the bottom of the ribcage
- From the sternum (center of chest) all the way out to the armpit
- Including the armpit itself, where breast tissue extends and where lymph nodes live
The breast does not stop at the visible boundary. Breast tissue extends into the armpit, toward the collarbone, and down toward the abdomen. Many women skip the axilla (armpit) entirely, and that’s a mistake. It needs the same thorough examination.
Once you’ve finished the right breast, reposition the pillow under your left shoulder, place your left hand behind your head, and repeat the entire process on the left side using your right hand.
Step Four: The Standing or Shower Breast Self-Exam
Many women find it easiest to include part of their breast self-exam in the shower, and there’s good reason for that. Wet, soapy skin reduces friction and allows fingers to glide more smoothly over breast tissue, which can make it easier to feel subtle changes.
Stand in the shower with your arm raised. Use the same finger-pad technique and vertical strip pattern described above. This position works well for the upper and outer portions of the breast. However, it’s worth noting that the lying-down exam is generally more thorough, so the shower exam works best as a complement, not a replacement.
If you prefer to do your standing check outside the shower, lean forward slightly at the waist. Gravity pulls the breast tissue downward and outward, which can help you feel the lower half of the breast more clearly.
Step Five: Checking the Nipple and Areola
The nipple and areola (the darker skin surrounding the nipple) deserve their own focused examination during every breast self-exam. Changes in this area can be among the earliest signs of certain breast conditions.
Look carefully at the nipple during your mirror inspection:
- Has it changed direction or newly turned inward?
- Is there any scaling, flaking, or crusting on the nipple skin?
- Is there redness or rash around the areola?
Then, gently squeeze each nipple between your thumb and forefinger. You’re checking for discharge. A small amount of discharge when squeezed is common and usually harmless, but the character of the discharge matters.
Discharge that is generally less concerning:
- Milky or cloudy (especially if you’ve been pregnant recently)
- Green or dark brown
- Only appears with deliberate squeezing
Discharge that warrants a prompt call to your doctor:
- Clear, watery discharge
- Pink or bloody discharge
- Discharge that leaks on its own without squeezing
- Discharge from only one breast or only one duct
Clear or bloody nipple discharge should never be dismissed or waited on. It doesn’t automatically mean cancer, but it does mean your doctor needs to know about it.
What You’re Actually Feeling For: A Breast Self-Exam Texture Guide
This is the section most guides skip, and it’s arguably the most important one. Knowing that you’re looking for “a lump” is about as helpful as knowing you’re looking for “something wrong.” Vague. Unhelpful. Anxiety-producing.
Here is a much more honest breakdown of what different breast textures actually feel like, and what they typically mean.
Normal Breast Texture (Your Baseline)
Healthy breast tissue is not smooth and uniform like a stress ball. It is inherently lumpy, bumpy, nodular, and uneven. This surprises a lot of women who panic the first time they perform a thorough breast self-exam and feel what seems like dozens of irregularities.
Normal breast tissue can feel like:
- Clusters of small BBs or peas, especially toward the outer upper quadrant
- Ropey or cord-like ridges, particularly around the lower edge
- A general fibrous, granular texture throughout
- Softer, fattier areas in some regions
This is completely normal. Breast tissue is made up of fat, glands, ducts, connective tissue, and ligaments, all of which have different textures. No two women’s breasts feel identical.
Fibrocystic Changes (Very Common)
More than half of all women will experience fibrocystic breast changes at some point. This means the breasts feel denser, lumpier, and more tender, especially in the week before a period. The lumps associated with fibrocystic changes typically:
- Feel smooth and round or oval in shape
- Move easily under the skin when you push them (like a small, slippery marble)
- May feel tender or sore
- Change in size throughout the menstrual cycle, often larger before a period and smaller after
These characteristics, movability, smooth edges, and cyclical changes, are reassuring signs that a lump is likely benign. That said, every new lump should be evaluated by a healthcare provider to confirm.
Simple Cysts (Fluid-Filled and Benign)
Breast cysts are fluid-filled sacs that are extremely common, especially in women in their 30s and 40s. On self-exam, a simple cyst typically feels:
- Soft to slightly firm, almost like a water balloon
- Round or oval with well-defined edges
- Movable under the skin
- Possibly tender, especially before a period
Cysts are almost always benign. The important distinction is whether they are new or changing. A cyst that has been stable for months is different from one that appeared suddenly and is growing.
Fibroadenomas (Benign Solid Lumps)
Fibroadenomas are the most common solid breast lump in young women. They feel distinctly different from a cyst or normal fibrocystic tissue:
- Firm or rubbery in consistency (like a dense, small rubber ball)
- Smooth edges, well-defined borders
- Very movable, sometimes dramatically so (they’ve earned the nickname “breast mouse”)
- Usually painless
Fibroadenomas are benign but should always be confirmed by imaging. They don’t increase cancer risk in most cases, but any newly discovered solid mass needs a professional evaluation.
Concerning Features That Require Prompt Medical Attention
Some lump characteristics are associated with a higher likelihood of a serious finding. These are not a diagnosis. They are a signal to see your doctor without delay.
Contact your healthcare provider promptly if you notice a lump that:
- Feels hard, stony, or fixed, meaning it doesn’t move when you push it
- Has irregular, jagged, or poorly-defined edges (not smooth or round)
- Is new and persistent after two full menstrual cycles
- Is accompanied by skin dimpling, puckering, or an orange-peel texture directly above it
- Is painless (counterintuitively, cancerous lumps are often painless, while benign lumps are often tender)
- Is accompanied by swollen lymph nodes under the arm
It bears repeating: finding something unusual does not mean you have cancer. The Mayo Clinic notes that the vast majority of breast lumps are benign. The goal is simply to get an accurate evaluation so you can stop worrying or start treatment as early as possible.
The Lymph Node Check: The Often-Forgotten Part of the Breast Self-Exam
Here’s a step that the majority of online guides either skip entirely or mention in a single throwaway sentence: checking the lymph nodes.
Lymph nodes under your arms (axillary lymph nodes) are part of the breast’s drainage system. When breast cancer spreads, the axillary lymph nodes are often one of the first places it goes. Including them in your monthly breast self-exam takes less than two minutes and adds meaningful information.
To check:
- Sit or stand comfortably and relax the arm on the side you’re checking.
- Use the pads of your fingers from the opposite hand.
- Press gently but firmly into the hollow of your armpit.
- Move your fingers in small circular motions, feeling for any firm, pea-sized lumps.
- Also feel along the collarbone area, both above and below it.
Normal lymph nodes are usually not palpable at all. Small, soft nodes that you can barely feel may be normal, especially if you’ve had a recent infection or cold. What you’re looking for is a firm, enlarged, or fixed node that is new and doesn’t go away within a few weeks.
Breast Self-Exam for Special Circumstances
A one-size-fits-all approach to breast self-exam doesn’t quite fit everyone. Here’s what changes for specific groups.
During Pregnancy and Breastfeeding
Your breasts will feel dramatically different during pregnancy and while nursing. They’ll be larger, denser, lumpier, and more tender than usual due to surging hormones and milk production. Performing a breast self-exam is still encouraged, but your baseline will shift significantly. Talk to your OB or midwife about what’s normal for your stage of pregnancy or nursing, and flag anything that feels distinctly different from the surrounding tissue.
Mastitis, an infection of the breast tissue common in breastfeeding women, can feel like a hard, hot, painful lump. It’s not cancer, but it does need treatment. Don’t ignore it.
After Menopause
Post-menopausal women often notice their breasts feel softer and less dense than before, because estrogen levels have dropped and glandular tissue has been partially replaced by fat. This can actually make breast self-exams somewhat easier. Lumps tend to be more distinct. Any new lump in a post-menopausal woman should be evaluated promptly, as fibrocystic changes become much less common after menopause and a new lump has different implications than in a younger woman.
With Breast Implants
Breast implants do not prevent you from doing a thorough breast self-exam. Because implants are placed beneath the breast tissue (or behind the chest muscle), your natural breast tissue still sits on top and can be examined normally. Some women find that implants actually make palpation easier by pushing the tissue forward. Use the same technique and patterns described above. If you had surgery recently, follow your surgeon’s specific guidance about pressure and timing.
With Dense Breast Tissue
Dense breasts contain more glandular and fibrous tissue relative to fat. On a mammogram, dense tissue appears white, and so do tumors, which is why dense breast tissue can make mammograms harder to read. On self-exam, dense breasts often feel generally lumpy and firm throughout. This is normal for you. The goal is still to learn your own baseline and notice any change from it. If you have been told you have dense breasts by a radiologist, ask your doctor whether supplemental screening (such as ultrasound or MRI) is appropriate for you.
Breast Self-Exam vs. Clinical Screening: Understanding the Difference
A breast self-exam is a powerful tool for building body awareness, but it works best as part of a broader early detection strategy, not in isolation. Here’s a clear breakdown of how different screening methods compare.
| Screening Method | What It Detects | Recommended Frequency | Detects Before Symptoms? | Who Performs It |
|---|---|---|---|---|
| Breast Self-Exam (BSE) | Lumps, skin changes, nipple changes | Monthly | Sometimes | You, at home |
| Clinical Breast Exam | Lumps, lymph nodes, skin and nipple changes | Annually for women 40+ | Sometimes | Doctor or nurse |
| Mammogram (2D or 3D) | Tumors too small to feel, microcalcifications | Annually from age 40 | Yes, often | Radiologist |
| Breast Ultrasound | Cysts vs. solid masses, dense tissue evaluation | As needed or supplementally | Occasionally | Radiologist / Sonographer |
| Breast MRI | High-risk screening, post-treatment monitoring | Annually for high-risk women | Yes | Radiologist |
As the table shows, each method fills in gaps that the others leave. A mammogram detects things too small to feel. A breast self-exam catches visual changes that a mammogram wouldn’t show. A clinical breast exam gives a trained clinician’s hands-on assessment. None of them is sufficient alone.
The USPSTF updated its guidelines in 2024 to recommend that screening mammography begin at age 40 for all women at average risk. If you haven’t started yet or have delayed your screening, this is a good time to schedule that appointment.
How to Keep Track of Your Breast Self-Exam Findings
You’ve done the exam. Now what?
A lot of women do a thorough breast self-exam, find something that feels lumpy or unusual, panic momentarily, then forget exactly where it was and what it felt like by the time they see their doctor two weeks later. Or they convince themselves it was nothing. Neither of these is ideal.
Keep a simple monthly log. It doesn’t need to be elaborate. A note on your phone, a calendar entry, or a small journal works perfectly. After each exam, note:
- The date
- How your breasts generally felt overall
- Any specific areas that felt different from last month
- Whether any tender spots resolved or persisted
- Any nipple or skin changes observed
This record becomes invaluable during a doctor’s visit. Instead of saying “I think I felt something maybe a few weeks ago, somewhere on the right side,” you can say “I first noticed this firm area in the outer upper right quadrant on March 15th. It’s still there a month later and hasn’t changed in size.” That’s clinical information a doctor can actually work with.
When to Call Your Doctor After a Breast Self-Exam
This guide would be incomplete without a clear, specific answer to the question: when do I actually pick up the phone?
Call your doctor within a few days if you notice:
- A new lump or thickening in the breast or armpit that is still there after your next period
- Any skin change: dimpling, puckering, redness, rash, or orange-peel texture
- A nipple that has newly turned inward
- Clear, pink, or bloody nipple discharge that appears without squeezing
- Persistent swelling in one breast with no obvious cause
- Any lump in a post-menopausal woman
Call your doctor promptly but don’t panic if you notice:
- A tender, smooth, movable lump that changes with your cycle (likely fibrocystic, but still worth confirming)
- Green or dark brown nipple discharge (common and usually benign, but should be checked)
- General breast heaviness or aching without a specific lump
You do not need to call your doctor immediately for:
- General lumpiness throughout both breasts that is consistent with your usual texture
- Breast tenderness that arrives before your period and resolves after
- Minor, temporary nipple discharge with squeezing that you’ve noticed before and confirmed was normal
If in doubt, call anyway. There is no such thing as bothering your doctor too much about this.
Building a Habit: Making Your Monthly Breast Self-Exam Stick
Knowing how to do a breast self-exam and actually doing it every month are two different things. Here’s how to close that gap.
The most effective strategy is to tie your breast self-exam to something you already do consistently. The shower is the obvious candidate, which is why so many clinicians recommend it. You’re already undressed, already using your hands, and there’s no setup required. The slippery skin even helps with palpation.
Other anchor habits that work:
- The night before you take birth control or any monthly medication
- The day you change your calendar month on the wall
- The morning after your last period day (which aligns perfectly with the recommended timing)
Set a recurring monthly reminder on your phone. Label it simply. When the reminder goes off, don’t negotiate. Just do it.
The first few months will feel awkward and uncertain. That’s completely normal and expected. Your hands don’t yet know what they’re looking for. Give yourself three to six months of consistent practice before expecting to feel confident. Each month builds on the last, and eventually, your breast tissue becomes as familiar to you as the back of your own hand.
That familiarity is the entire point.
Conclusion: Your Breasts, Your Knowledge, Your Confidence
A breast self-exam isn’t about fear. It isn’t about sitting in front of a mirror every month waiting to find something terrible. It’s about ownership, familiarity, and giving yourself the best possible chance of catching something early if something ever does appear.
The women who find lumps early, who get diagnoses when tumors are still small and treatment is most effective, are almost always women who knew their bodies well enough to notice a change. That knowledge is built one monthly self-exam at a time.
You now have everything you need to do this correctly: the timing, the positions, the technique, the patterns, the pressure levels, the nipple check, the lymph node check, and most importantly, a clear understanding of what you’re actually feeling for and what it might mean.
None of this replaces a mammogram. None of it replaces a clinical breast exam with your doctor. It works with those tools, not instead of them. Together, they form the most complete early detection strategy available to you.
Start this month. Your future self will thank you.
Frequently Asked Questions About Breast Self-Exams
How long should a breast self-exam take? A thorough breast self-exam, including the visual check, both breasts, the nipple check, and the axillary lymph node check, should take about 10 to 15 minutes. Rushing defeats the purpose.
What if my breasts always feel lumpy? This is extremely common, especially in women with fibrocystic breast tissue. The goal is not to have smooth breasts. The goal is to know your lumpy baseline, so that anything new or different stands out clearly.
Is it normal to feel my ribs during a breast self-exam? Yes. When you press firmly along the lower portions of the breast, especially toward the outer edges, you will likely feel your ribs. Rib edges can feel like firm, slightly bumpy horizontal ridges. They move symmetrically on both sides and don’t change from month to month.
Should I do a breast self-exam if I’ve had a mastectomy? Yes, but the exam changes depending on the type of surgery. If you had a lumpectomy, examine the remaining tissue exactly as described here. If you had a mastectomy, examine the chest area and scar tissue for any new lumps or changes. Discuss the specifics with your surgeon or oncologist.
At what age should I start doing breast self-exams? Most guidelines suggest that women begin doing monthly breast self-exams in their 20s. The earlier you start building a baseline, the more meaningful that baseline becomes over time.
Share this post with a woman in your life who needs it. Whether she’s a daughter starting to think about her health, a friend who’s been meaning to start this habit, or a mother who’s never quite been shown how to do this correctly, this knowledge matters.
Drop a comment below if this guide answered a question you’ve had for a long time. Your question might be the one that helps someone else feel seen, too.
This article is intended for informational purposes only and does not constitute medical advice. Always consult with a qualified healthcare professional regarding any questions about your health or medical conditions.